이전 시간에는 레이아웃을 어떻게 만드는지에 대해서 학습했습니다.
이번 시간에는 사용자가 값을 입력했을 때 데이터를 어떻게 처리하는지에 대해서 살펴보도록 하겠습니다.
즉, 사용자 행동에 따른 이벤트 처리를 학습합니다.
Handling Text Input
흔히 유저가 입력을 위해서 많이 사용하는 것이 텍스트 화면입니다.
리액트 네이티브에서는 사용자가 텍스트를 입력하는 걸 TextInput 컴포넌트를 이용합니다.
이중에 onChangeText라는 prop가 있습니다. 이 prop는 입력된 텍스트가 변할 때마다 호출되는 prop입니다.
onChangeText를 어떻게 사용되는지 예제 코드를 보도록 하겠습니다.
import React, { Component } from 'react';
import { Text, TextInput, View } from 'react-native';

export default class PizzaTranslator extends Component {
  constructor(props) {
    super(props);
    this.state = {text: ''};
  }

  render() {
    return (
      <View style={{top:30, padding: 10}}>
        <TextInput
          style={{height: 40}}
          placeholder="Type here to translate!"
          onChangeText={(text) => this.setState({text})}
          value={this.state.text}
        />
        <Text style={{padding: 10, fontSize: 42}}>
          {this.state.text.split(' ').map((word) => word && '🍕').join(' ')}
        </Text>
      </View>
    );
  }
}
TextInput 컴포넌트를 사용해서 사용자가 텍스를 입력할 수 있도록 입력창을 만들었습니다.
onChangeText가 사용되었는데요. 입력값이 변경될 때마다 호출이 됩니다. text가 this.setState(text)를 통해서 state가 변경이 되는데요.
state 값이 변경되면 어떻게 된다고 했었죠? 앞, 앞 강의에서 설명드렸다시피 컴포넌트가 다시 렌더가 됩니다.
입력창 아래 보면 Text 컴포넌트가 있습니다. state 변경될 때(사용자가 글을 작성할 때)마다 띄어쓰기 구분에 따라서 피자 모양을 화면에 보여줍니다 :)
텍스트가 제출 되어질 때는 onSubmitEditing prop를 하시면 됩니다. 조금 더 상세한 예시는 다음 url을 첨부 하도록 하겠습니다.
https://reactjs.org/docs/forms.html#controlled-components
http://reactnative.dev/docs/textinput
Handling Touches
모바일 환경에서는 사용자와 주 상호작용 행동은 바로 터치입니다. 사용자는 버튼 터치, 리스트 스크롤, 확대 와 같은 다양한 제스쳐를 행동합니다. 가장 기본적이고 가장 많이 사용하는 터치에 대해서 학습을 하도록 하겠습니다.
import React, { Component } from 'react';
import { Button, StyleSheet, View } from 'react-native';

export default class ButtonBasics extends Component {
  _onPressButton() {
    alert('You tapped the button!')
  }

  render() {
    return (
      <View style={styles.container}>
        <View style={styles.buttonContainer}>
          <Button
            onPress={this._onPressButton}
            title="Press Me"
          />
        </View>
        <View style={styles.buttonContainer}>
          <Button
            onPress={this._onPressButton}
            title="Press Me"
            color="#841584"
          />
        </View>
        <View style={styles.alternativeLayoutButtonContainer}>
          <Button
            onPress={this._onPressButton}
            title="This looks great!"
          />
          <Button
            onPress={this._onPressButton}
            title="OK!"
            color="#841584"
          />
        </View>
      </View>
    );
  }
}

const styles = StyleSheet.create({
  container: {
   flex: 0.5,
   justifyContent: 'center',
  },
  buttonContainer: {
    margin: 20
  },
  alternativeLayoutButtonContainer: {
    margin: 20,
    flexDirection: 'row',
    justifyContent: 'space-between'
  }
});
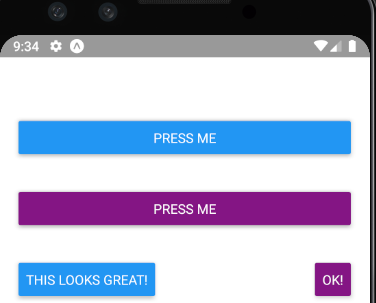
Button을 4개 만들었습니다. Button에는 onPress가 있습니다. 버튼이 눌릴 때마다 onPress에 등록된 함수가 호출이 되어집니다. 등록된 함수는 alert() 창을 띄어줍니다. 크게 어려운게 없는 듯 합니다.
앞쪽에 학습한 내용들로인해서 코드를 계속 보실 수록 조금 더 리액트 네이티브와 익숙해지고 있습니다. StyledSheet.create()도 계속 봐오던 코드고 레이아웃 작성 코드도 이전 파트에서 학습했던 내용입니다. 조금씩 조금씩 성장하고 있습니다 :)

Touchable - 조금 더 다양한 Button 동작
위에서는 기본적인 버튼을 만들었습니다. 개발을 하실 때 위의 버튼으로도 충분하나 개발을 하시다 보면 욕심이 생기고 기능이 필요로 하게 됩니다. 버튼이 눌렸을 때 색이 변한다거나 조금 더 나은 모습을 보고 싶습니다.
그렇다면 다음과 같은 컴포넌트들이 있습니다.
TouchableHighlight / TouchableOpacity / TouchableNativeFeedback / TouchableWithoutFeedback
위의 컴포넌트들을 사용한 예제 코드를 보고 컴포넌트들에 대해서 간략히 설명을 드리겠습니다.
import React, { Component } from 'react';
import { Platform, StyleSheet, Text, TouchableHighlight, TouchableOpacity, TouchableNativeFeedback, TouchableWithoutFeedback, View } from 'react-native';

export default class Touchables extends Component {
  _onPressButton() {
    alert('You tapped the button!')
  }

  _onLongPressButton() {
    alert('You long-pressed the button!')
  }


  render() {
    return (
      <View style={styles.container}>
        <TouchableHighlight onPress={this._onPressButton} underlayColor="white">
          <View style={styles.button}>
            <Text style={styles.buttonText}>TouchableHighlight</Text>
          </View>
        </TouchableHighlight>
        <TouchableOpacity onPress={this._onPressButton}>
          <View style={styles.button}>
            <Text style={styles.buttonText}>TouchableOpacity</Text>
          </View>
        </TouchableOpacity>
        <TouchableNativeFeedback
            onPress={this._onPressButton}
            background={Platform.OS === 'android' ? TouchableNativeFeedback.SelectableBackground() : ''}>
          <View style={styles.button}>
            <Text style={styles.buttonText}>TouchableNativeFeedback {Platform.OS !== 'android' ? '(Android only)' : ''}</Text>
          </View>
        </TouchableNativeFeedback>
        <TouchableWithoutFeedback
            onPress={this._onPressButton}
            >ㅌ
          <View style={styles.button}>
            <Text style={styles.buttonText}>TouchableWithoutFeedback</Text>
          </View>
        </TouchableWithoutFeedback>
        <TouchableHighlight onPress={this._onPressButton} onLongPress={this._onLongPressButton} underlayColor="white">
          <View style={styles.button}>
            <Text style={styles.buttonText}>Touchable with Long Press</Text>
          </View>
        </TouchableHighlight>
      </View>
    );
  }
}

const styles = StyleSheet.create({
  container: {
    paddingTop: 60,
    alignItems: 'center'
  },
  button: {
    marginBottom: 30,
    width: 260,
    alignItems: 'center',
    backgroundColor: '#2196F3'
  },
  buttonText: {
    textAlign: 'center',
    padding: 20,
    color: 'white'
  }
});
Button 컴포넌트 대신 4가지 컴포넌트들이 사용 됐습니다.

TouchableHighlight : 터치가 되었을 때 색을 어둡게 하거나 underlayColor prop를 활용하여 특정 색을 활성화 시킵니다.
TouchableOpacity : 사용자가 터치 했을 때 버튼을 불투명하게 합니다.
TouchableNativeFeedback : 터치 했을 때 잔물결이 일어납니다. 이런 잔물결을 사용자에게 피드백을 준다는 뜻으로 사용이됩니다.
TouchableWithoutFeedback : 터치 했을 때 잔물결이 일어나지 않습니다.
마지막 버튼에서는 "onLongPress" prop가 사용되었습니다. 짧게 눌리면 일반적인 "onPress" prop가 호출되고 길게 눌리면 "onLongPress"가 호출됩니다.
버튼보다 조금 더 고급화된 컴포넌트들을 설명 드렸습니다. 일단은 쓱 한번 봐주시고 개발하실 때 Button 컴포넌트들을 사용하시다가 필요로 할 때 사용해주셔도 되겠습니다.
감사합니다 :)
'개발 이야기 > 앱 만들기(RN)' 카테고리의 다른 글
| 리액트 네이티브 - 화면을 쭉 내리는 스크롤 뷰와 리스트 뷰를 사용하자 (0) | 2020.03.01 |
|---|---|
| 리액트 네이티브 - flexbox를 활용해 UI(레이아웃)를 디자인 하자 (0) | 2020.02.28 |
| 리액트 네이티브 디자인 기초 - Style, height, width, flex개념 (0) | 2020.02.27 |
| 리액트 네이티브의 기초 - Hello React 그리고 props 와 state (0) | 2020.02.26 |
| 리액트 네이티브는 어떻게 학습을 해야될까요? (0) | 2020.02.24 |