step을 구성하는 요소는 크게 2가지가 있습니다. tasklet 방식과, itemXXX방식을 사용하여 처리하는 방식입니다.
앞에 포스트에서는 tasklet을 사용하여 hello world를 봤습니다.
이번 시간에는 ItemReader / ItemProcessor / ItemWriter 을 사용하는 예제를 살펴보겠습니다.
A라는 테이블에서 데이터를 읽어온 후에 B라는 테이블에 데이터를 입력하는 내용입니다.
1. 데이터를 읽은 후에 데이터 저장을 할 수 있도록 테이블을 생성
-- 데이터를 읽을 타겟 테이블
CREATE TABLE `test`.`plain_text` (
  `id` INT NOT NULL AUTO_INCREMENT,
  `text` VARCHAR(100) NOT NULL,
  PRIMARY KEY (`id`));

 -- 읽은 데이터를 저장할 타겟 테이블
  CREATE TABLE `test`.`house_text` (
  `id` INT NOT NULL AUTO_INCREMENT,
  `text` VARCHAR(100) NOT NULL,
  PRIMARY KEY (`id`));

-- 기본 데이터 입력
INSERT INTO `test`.`plain_text` (`text`) VALUES ('hi');
INSERT INTO `test`.`plain_text` (`text`) VALUES ('good');
INSERT INTO `test`.`plain_text` (`text`) VALUES ('good!!');
INSERT INTO `test`.`plain_text` (`text`) VALUES ('bye');
INSERT INTO `test`.`plain_text` (`text`) VALUES ('hehe');
INSERT INTO `test`.`plain_text` (`text`) VALUES ('hello!!');
테이블 생성과, 읽어 올 데이터를 생성 하였습니다.
2. 데이터베이스를 읽을 수 있도록 도메인 및 레파지토리 생성
도메인
@Entity
@Getter
@Setter
@DynamicUpdate
@AllArgsConstructor
@NoArgsConstructor
@Table(name="plain_text")
public class PlainText {

    @Id
    @GeneratedValue(strategy = GenerationType.IDENTITY)
    private Integer id;

    @Column(nullable=false)
    private String text;
}
테이블을 생성한 기반으로 도메인 클래스를 만들었습니다.
레파지토리 생성
public interface PlainTextRepository extends JpaRepository<PlainText, Integer> {
    Page<PlainText> findBy(Pageable pageable);
}
데이터를 읽을 수 있도록 레파지토리 생성.
result_text 도메인과 레파지토리도 plain_text와 같이 생성해주세요.
3. Job 생성
@Configuration
@RequiredArgsConstructor
public class PlainTextJobConfig {

    private final JobBuilderFactory jobBuilderFactory;

    private final StepBuilderFactory stepBuilderFactory;

    private final PlainTextRepository plainTextRepository;

    private final ResultTextRepository resultTextRepository;

    @Bean
    public Job plainTextJob(Step plainTextStep) {
        return jobBuilderFactory.get("plainTextJob")
                .incrementer(new RunIdIncrementer())
                .start(plainTextStep)
                .build();
    }

    @JobScope
    @Bean
    public Step plainTextStep(
            ItemReader plainTextReader,
            ItemProcessor plainTextProcessor,
            ItemWriter plainTextWriter) {
        return stepBuilderFactory.get("plainTextStep")
                .<PlainText, String>chunk(5)
                .reader(plainTextReader)
                .processor(plainTextProcessor)
                .writer(plainTextWriter)
                .build();
    }

    @StepScope
    @Bean
    public RepositoryItemReader<PlainText> plainTextReader() {
        return new RepositoryItemReaderBuilder<PlainText>()
                .name("plainTextReader")
                .repository(plainTextRepository)
                .methodName("findBy")
                .pageSize(5)
                .arguments(List.of())   // 전달할 파라미터 있으면 리스트로 넘겨주기.
                .sorts(Collections.singletonMap("id", Sort.Direction.DESC))
                .build();
    }

    @StepScope
    @Bean
    public ItemProcessor<PlainText, String> plainTextProcessor() {
        return new ItemProcessor<PlainText, String>() {
            @Override
            public String process(PlainText item) throws Exception {
                return "processed: " + item.getText();
            }
        };
    }

    @StepScope
    @Bean
    public ItemWriter<String> plainTextWriter() {
        return items -> {
            items.forEach(
            	item -> resultTextRepository.save(new ResultText(null, item))
            );
            System.out.println("===== chunk is finished ====");
        };
    }
}
Job과 Step을 생성하고, Step에는 ItemReader / ItemProcessor / ItemWriter 을 구현하여 연결 하였습니다.
Job이 실행 되고 -> Step이 실행되면서 ItemReader / ItemProcessor / ItemWriter 구성이 각각 수행이 되겠습니다.
배치 실행 결과)

Chunk is finished가 2번이 출력된 모습을 보실 수 있습니다. chunk 사이즈를 5로 하였기 때문에 데이터는 5개씩 처리가 되겠습니다. 총 데이터는 6개가 존재합니다. 5개가 처리되고 나머지 1개도 처리가 되기 때문에 wirter는 총 2번이 호출이 되었습니다.
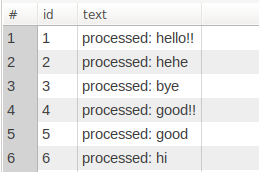
result_text 실행 결과)

타겟 테이블에 우리가 원하는 데이터가 입력이 된 모습을 보실 수 있습니다.
'Programming > Spring Batch' 카테고리의 다른 글
| [Spring Batch] 스프링 배치 파라미터 입력 및 검증 (0) | 2022.04.05 |
|---|---|
| [Spring Batch] 스프링 배치 테스트 코드 작성 (0) | 2022.04.01 |
| [Spring Batch] 스프링 배치로 Hello, World 실행하기 예제 (tasklet 사용) (0) | 2022.03.29 |
| [Spring Batch] 스프링 배치의 기본 구조 및 큰 그림 그리기 (0) | 2022.03.27 |
| [Spring Batch] 배치 작업이 필요한 이유? (0) | 2022.03.25 |